Understanding Teeth Whitening in Lightroom
Teeth whitening in Lightroom is a digital process that enhances the appearance of teeth in photographs, making them appear brighter and whiter. It’s a common retouching technique used by photographers and photo editors to improve portraits, headshots, and any image where the subject’s smile is prominent. This process goes beyond simple adjustments; it involves targeted manipulations to remove discoloration, adjust brightness, and correct color casts. While the ultimate goal is to create a natural and appealing result, it’s important to understand the tools and techniques to avoid over-editing. Knowing how to properly whiten teeth can dramatically improve the overall aesthetic of your photos, creating a polished and professional look.
Why Use Lightroom for Teeth Whitening?
Lightroom offers a streamlined workflow for photo editing, making it an excellent choice for teeth whitening. Its non-destructive editing capabilities allow you to make adjustments without altering the original image, providing flexibility and control. The user-friendly interface, coupled with powerful tools, enables both beginners and experienced editors to achieve professional results. Lightroom’s integration with other Adobe products also streamlines the workflow if you need to move between different editing software. Furthermore, its efficient processing of RAW files ensures that you retain maximum image quality during the editing process. These features combine to create a powerful platform.
Benefits of Lightroom for Photo Editing

Lightroom provides a range of benefits that make it ideal for photo editing, including teeth whitening. The non-destructive editing workflow is a key advantage, as it allows you to experiment with different adjustments without permanently altering the original image. The software’s comprehensive set of tools, like the Adjustment Brush and Targeted Adjustment Tool, offers precision control over specific areas of the photo, such as the teeth. Its RAW file processing capabilities ensure that you are working with the highest quality image data, retaining the most detail and flexibility during editing. The intuitive interface, combined with powerful features, makes Lightroom accessible to both beginners and professionals, making it a versatile option for any photo editing task. The ability to sync edits across multiple images further enhances efficiency.
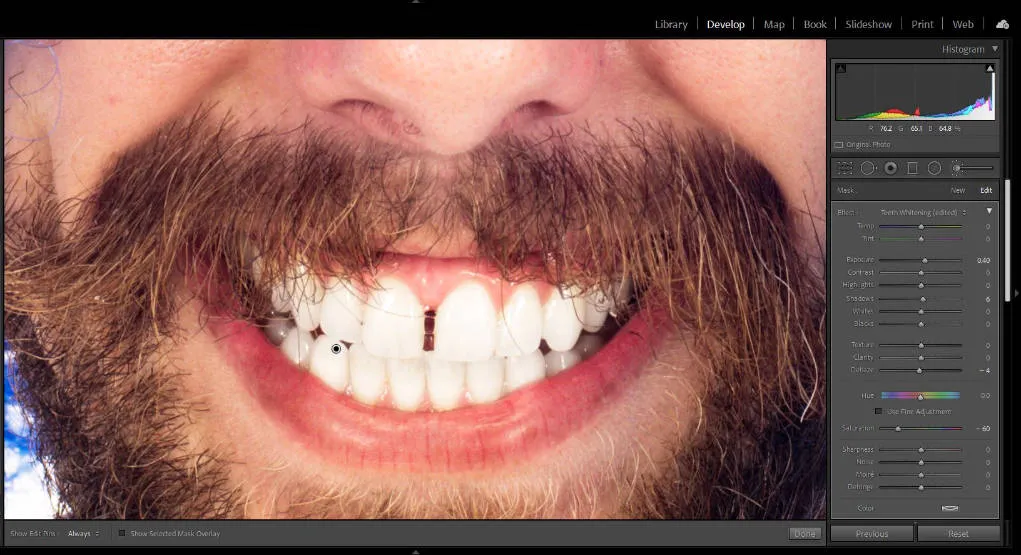
Tools Needed for Teeth Whitening in Lightroom
To successfully whiten teeth in Lightroom, you’ll need access to specific tools designed for localized adjustments. The Adjustment Brush tool is a cornerstone of this process, as it allows you to paint over the areas you want to modify, such as the teeth. The Exposure and Brightness sliders are crucial for adjusting the overall luminosity of the teeth, making them appear brighter. You will also need the Whites and Highlights sliders to fine-tune the brightness and remove any harsh yellow tones. Furthermore, the Saturation slider lets you control the intensity of the colors, ensuring a natural and balanced look. The Targeted Adjustment Tool is important for making precise color adjustments and addressing specific hues like yellow. Utilizing these tools together will help you create a natural and appealing smile.
The Lightroom Interface and Tools
The Lightroom interface is designed to be intuitive and efficient, offering a range of tools for photo editing. The main panel is used for adjusting color and tone, and the Adjustment Brush tool is essential for selective editing, like teeth whitening. The Histogram provides a visual representation of the image’s tonal range. The basic panel, within the Develop module, houses sliders for Exposure, Contrast, Highlights, Shadows, Whites, and Blacks, offering overall image adjustments. The Color panel lets you fine-tune individual colors, which is critical for adjusting the yellow tones in teeth. The Details panel helps control sharpness and noise reduction, while the Lens Corrections panel addresses lens distortions. Understanding the layout and functionality of these tools will help improve your workflow. (Image: Lightroom Interface)
Step-by-Step Guide to Teeth Whitening in Lightroom

Whitening teeth in Lightroom is a straightforward process. Begin by importing your photo into the Lightroom library. Then, open the photo in the Develop module. The first step is to use the Adjustment Brush to paint over the teeth. Then, adjust the Exposure and Brightness sliders to brighten them. Next, fine-tune the Whites and Highlights to create a more natural look, avoiding a stark white appearance. Additionally, use the Saturation slider to reduce any yellow tones, keeping the teeth color balanced with the skin and other elements. Further refinement may be done with the Targeted Adjustment Tool to address any specific color casts. Lastly, export the photo with the appropriate settings, such as file type and resolution, for your desired use. Practice and experimentation are essential to master the technique and create excellent results.
Importing and Opening Your Photo
Start by importing the photo you want to edit into Lightroom. You can do this by clicking the “Import” button in the Library module and selecting the image file from your computer. After importing, switch to the Develop module. In the Develop module, you will find all the tools needed to whiten teeth. Take the time to ensure the photo is properly exposed and balanced, as this will affect the final result. Selecting the correct photo is essential before beginning. (Image: teeth-before-after)
Using the Adjustment Brush Tool
The Adjustment Brush tool is crucial for local adjustments, like teeth whitening. Select the Adjustment Brush tool from the toolbar in the Develop module. It allows you to paint specific areas of the image, such as the teeth, to make changes without affecting the rest of the photo. Adjust the brush size and feathering to match the contours of the teeth, ensuring smooth transitions. Set the brush settings to a low feather and a moderate flow to prevent harsh lines and create a natural look. Adjust the size of the brush according to the area you are targeting. (Image: Adjustment Brush)
Applying the Brush to the Teeth

Carefully paint over the teeth using the Adjustment Brush tool. Be precise to prevent over-editing or affecting the gums or surrounding areas. Pay close attention to the edges of the teeth, feathering the brush slightly to blend your adjustments seamlessly. Start by making gentle adjustments, as it is easier to add more than to correct over-editing. Take breaks to review and zoom in to ensure that you maintain a natural appearance. Be careful to ensure you don’t over-brush the image.
Adjusting Exposure and Brightness
After painting the brush over the teeth, start by adjusting the Exposure slider in the Adjustment Brush settings. Increasing the Exposure slider will brighten the teeth. Adjust the Brightness slider to further refine the look. It is crucial to find a balance that enhances the brightness without creating an unnatural, over-whitened effect. Start with subtle changes and carefully observe the results to achieve the desired outcome. (Image: exposure-brightness)
Tweaking Whites and Highlights
Fine-tuning the Whites and Highlights sliders helps to enhance the brightness and remove harsh yellow tones. Increase the Whites slider to brighten the brightest parts of the teeth. The Highlights slider affects the brightest areas, making them pop without over-exposing the image. Carefully adjusting these sliders will add depth and a natural glow to the teeth, improving their appearance. Proceed carefully to not overdo it. The aim is to enhance, not to transform.
Adjusting the Saturation

The Saturation slider is a key tool for correcting unwanted yellow tones in teeth. By reducing the saturation, you can diminish the yellow color, making the teeth appear whiter and more natural. Use the slider to subtly reduce saturation, monitoring the result to make sure you don’t remove color. Be very careful not to desaturate the teeth excessively, as this will cause them to look unnatural and flat. Adjusting saturation will add a professional touch. (Image: saturation-adjustment)
Fine-tuning Details and Clarity
Details and Clarity can add sharpness and definition, but use them with caution. The Details panel allows you to adjust the sharpness, but applying too much will give the teeth an artificial appearance. If needed, apply minor adjustments to the Clarity slider, which adds definition and punch. Avoid excessive clarity, which can make the teeth appear too stark. Fine-tuning Details and Clarity can make a big difference in the overall impact of the photograph, especially when combined with other techniques.
Using the Targeted Adjustment Tool
The Targeted Adjustment Tool is a very useful and powerful feature in Lightroom, allowing very specific color and hue adjustments. Click on the icon in the Develop module to activate it. Select the color range you want to adjust by clicking directly on the teeth. Lightroom will then allow you to adjust the Hue, Saturation, and Luminance of that specific color. This is essential for removing any remaining yellow tones. (Image: targeted-adjustment)
Removing Yellow Tones

Use the Targeted Adjustment Tool to specifically address and remove the yellow tones from teeth. Select the yellow color range to target. Adjust the Hue slider to shift the yellow tones towards a whiter shade. Reduce the Saturation to minimize the yellow color. You may also subtly increase the Luminance to brighten the specific color range. Take great care, as it is easy to go too far. Making careful adjustments ensures a natural and appealing appearance. Remember that the goal is to enhance, not entirely transform the teeth.
Exporting and Saving Your Edited Photo
Once you’re satisfied with the teeth whitening, export the image. Select the “Export” option in Lightroom. Choose the appropriate settings for your intended use, such as the file type (JPEG or TIFF) and resolution. When exporting, you can adjust the image size, resolution, and other parameters. Always choose high quality settings to retain the best details. Carefully select the export location to save your edited photo. Consider how the image will be used (print, web) to choose the best export settings. Review the final result after exporting. The export process is important for the final result.
Choosing the Right Export Settings
Selecting the correct export settings is crucial for preserving image quality and ensuring that your photo looks its best. The file type selection depends on the intended use. For web use, JPEG is ideal. For print, TIFF or high-quality JPEG are better. The resolution of your image should align with its final application. For printing, a higher resolution (300 dpi or more) is recommended. When exporting, always select appropriate color space. The settings will affect the overall quality. (Image: export-settings)
Common Mistakes to Avoid

When whitening teeth in Lightroom, there are some common mistakes to be aware of and avoid. Over-whitening is a frequent issue that leads to an unnatural appearance. It’s vital to be subtle with your adjustments. Not using local adjustments is another common error; this results in a lack of precision. Overlooking detail can compromise the final look of the image. Experimenting and knowing how to avoid these mistakes can help greatly improve the outcomes. Being aware of these mistakes will improve your editing.
Over-Whitening and Creating Unnatural Results
Over-whitening is a common mistake that leads to an artificial look. Overuse of the Exposure and Brightness sliders, or excessive desaturation, can make teeth appear unnaturally bright and flat. Avoid stark, overly white teeth, as this creates an unrealistic impression. Make small, subtle adjustments instead, checking the results carefully. Aim for a look that is natural, so avoid the tendency to go overboard. Practice moderation to get the best results.
Not Using Local Adjustments
Failing to use local adjustments, such as the Adjustment Brush tool, will result in inaccurate, unnatural results. Applying global adjustments to the entire image isn’t effective for teeth whitening, as it will alter the overall appearance. Always use local adjustment tools to control the process and adjust only the specific areas needed. Apply the brush tool over the teeth and use the sliders. Using only global adjustments will lead to a less refined and professional look. This is a frequent and easily avoided error. This is a key to natural looking results.