Understanding Teeth Whitening in Lightroom
Lightroom, a powerful photo editing software, offers a range of tools that can be used to whiten teeth in your images. While it’s not a replacement for professional dental work, Lightroom allows photographers to enhance the appearance of teeth, making them look brighter and more appealing. This guide will walk you through the process, explaining the techniques and providing tips to achieve natural-looking results. The ability to whiten teeth is a valuable skill for photographers, especially in portrait and lifestyle photography where a bright smile can significantly enhance the overall image.
Why Whiten Teeth in Lightroom
There are several reasons why you might want to whiten teeth in Lightroom. Subtle adjustments can correct imperfections, such as slight discoloration or staining caused by coffee, tea, or other foods. This can improve the overall aesthetics of a portrait, making the subject appear healthier and more confident. Furthermore, teeth whitening in Lightroom can be a convenient alternative to more expensive or invasive dental procedures, especially for minor touch-ups. It also allows you to maintain consistency in your images, ensuring that teeth appear uniformly white across a series of photos.
Benefits of Using Lightroom for Teeth Whitening

Lightroom provides several advantages for teeth whitening. Its non-destructive editing process ensures that your original image remains untouched, allowing you to experiment with different techniques without risk. The software offers precise control over the whitening process, allowing you to target specific areas of the teeth and adjust the intensity of the effect. With Lightroom, you have access to a wide range of tools, including local adjustment brushes, graduated filters, and color adjustments, to achieve natural-looking results. Lightroom also allows for batch processing, which means you can apply the same whitening adjustments to multiple photos efficiently, saving you valuable time.
The Limitations of Lightroom Teeth Whitening
While Lightroom is a powerful tool, it’s important to be aware of its limitations. It cannot fix severe dental issues such as crooked teeth, significant gaps, or extreme discoloration. The effects of Lightroom are primarily cosmetic and are best suited for minor adjustments. Overuse of the whitening tools can result in an unnatural, artificial look, which is something to avoid. Remember that the goal is to enhance the appearance of the teeth, not to completely transform them. If the teeth have significant issues, it’s advisable to recommend professional dental care. Excessive editing can also make the image appear unrealistic.
Step-by-Step Lightroom Teeth Whitening Tutorial
Importing and Preparing Your Image

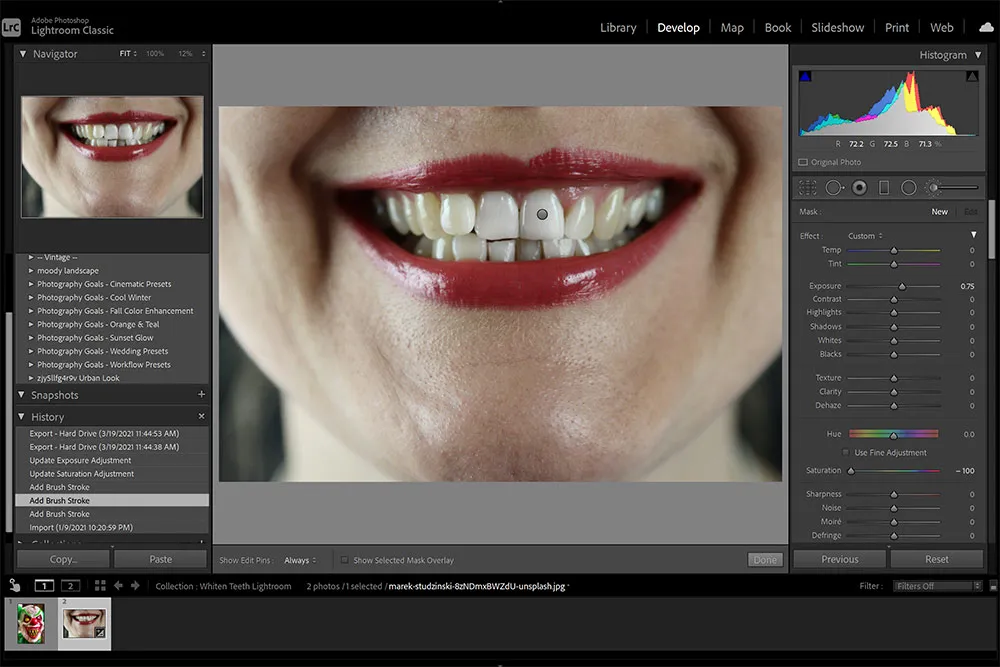
Begin by importing your image into Lightroom. Ensure the image is properly exposed and focused. Before you begin whitening, it’s a good idea to make any necessary global adjustments to the image, such as adjusting the exposure, contrast, and white balance. These adjustments will set the foundation for your whitening process. Open the Develop module and select the image you want to edit. Check that your white balance is correct; this impacts the apparent color of the teeth. A slightly cool white balance often works well. Then, zoom in on the teeth to work with greater precision. This helps you see the impact of your changes.
Selecting the Teeth Using Local Adjustments
The key to natural-looking teeth whitening is to apply the adjustments locally, meaning only to the teeth. In Lightroom, you can achieve this using the Adjustment Brush tool. Select the Adjustment Brush from the toolbar. Adjust the brush size, feather, and flow to suit the teeth in your image. A small brush size with a soft feather is usually best for precise control. Carefully paint over the teeth, ensuring the brush strokes stay within the boundaries of the teeth. The brush should be precise, avoiding the gums and any surrounding skin.
Adjusting the Exposure and Contrast of the Teeth
Once you’ve selected the teeth with the Adjustment Brush, you can begin making adjustments in the Brush panel. Start by slightly increasing the exposure. This will brighten the teeth. Next, gently increase the contrast to add definition and make the teeth appear brighter. However, be careful not to overdo it, as excessive contrast can make the teeth look artificial. Make subtle changes at first, reviewing your results and making adjustments as needed. Remember that the goal is to enhance, not to drastically alter the appearance.
Tweaking the Whites and Highlights for Whitening

Further refine the whitening effect by adjusting the Whites and Highlights sliders. Increase the Whites slider to brighten the brightest areas of the teeth. Then, slightly increase the Highlights slider to add more brightness and detail. Again, make small adjustments. Monitor the overall appearance and avoid pushing these sliders too far, as it can cause the teeth to look unnatural or blown out. The goal is to create a balanced look, where the teeth appear bright and healthy without appearing artificial.
Adjusting the Shadows and Blacks for a Natural Look
To maintain a natural look, it’s crucial to manage the Shadows and Blacks sliders. Slightly decrease the Shadows slider to add depth and dimension to the teeth. This will prevent them from appearing flat. The shadows add details. Then, gently decrease the Blacks slider to make the darkest areas of the teeth, such as the gaps between them, a bit darker. This adds contrast and helps to separate the teeth from each other. The objective is to achieve a balance where the teeth look bright, but still retain natural shadows and detail.
Using the Color Mixer and HSL Panel
The Color Mixer panel, specifically the HSL (Hue, Saturation, Luminance) panel, is another powerful tool for teeth whitening in Lightroom. This panel allows you to fine-tune the colors of the teeth, often yellow or orange. Select the HSL panel in the Develop module and choose the Hue tab. Drag the Hue slider towards the yellow or orange to adjust the colors of the teeth. This can help reduce any yellowish or orange tints. Proceed carefully to avoid making the teeth appear gray or unnatural.
Fine-tuning the Color for a Realistic Whitening Effect

After adjusting the Hue, switch to the Saturation tab. Lower the Saturation of the yellow and orange colors to desaturate those colors in the teeth, making them less yellow. Next, go to the Luminance tab. Increase the Luminance of the yellow and orange colors to brighten them. This can further whiten the teeth without making them look flat. The combination of hue, saturation, and luminance adjustments can significantly improve the appearance of the teeth. It’s essential to work in small increments, reviewing the results to see what works best for the image. The aim is to achieve the best balance and achieve the best results.
Avoiding an Artificial Look
The key to success in teeth whitening is to avoid making the teeth appear unnatural. This is often achieved by overdoing the adjustments. Avoid extreme whitening. Aim for a natural enhancement rather than a dramatic transformation. Be mindful of the overall balance of the image. If the teeth are significantly brighter than the surrounding skin, they will look artificial. Use subtle adjustments. Fine-tune until the teeth look clean, bright, and naturally white. Regularly zoom out to view the overall picture.
Advanced Lightroom Teeth Whitening Techniques
Using the Adjustment Brush for Precise Control

The Adjustment Brush tool is your primary tool for local adjustments. Experiment with the brush settings, such as feather and flow, to achieve the best results. You can create multiple brush strokes and apply different adjustments to each stroke, allowing for precise control over the whitening effect. If you make a mistake, use the eraser tool to remove unwanted brush strokes. You can also use the ‘Mask Overlay’ feature to see where the brush strokes are applied. This helps to refine the selection and avoid accidentally whitening areas beyond the teeth.
Applying Graduated Filters for Selective Whitening
Graduated Filters are another powerful tool. The graduated filter tool is ideal for whitening large areas of the teeth. The main idea is to draw a linear gradient over the teeth and apply your adjustments. This tool is particularly useful if the teeth are uneven or have large areas of discoloration. Use the graduated filter to apply a subtle whitening effect across the entire teeth. Adjust the exposure, contrast, and white balance to your liking. This approach provides a more uniform whitening effect.
Dealing with Uneven Teeth and Stains
Sometimes, teeth have uneven coloration or stains. Use the Adjustment Brush and graduated filters. First, select the Adjustment Brush and apply local adjustments to specific areas that require more whitening. For areas with stubborn stains, use a smaller brush size and apply the brush stroke carefully. For particularly stubborn stains, you may need to reduce the saturation of the colors. Consider using the Healing Brush or Clone Stamp tool to remove small imperfections. However, avoid using these tools too heavily. Aim for realistic, natural looking results.
Exporting and Sharing Your Whitened Photos

Optimizing Images for Web and Print
Once you’re happy with the teeth whitening results, it’s time to export and share your photos. In the Export dialog, select the appropriate settings for your intended use. If you’re sharing your photos online, optimize them for web use by reducing the file size and choosing an appropriate quality setting. For print, use a higher resolution and select a color profile suitable for printing. It’s also important to add metadata such as copyright and keywords. To create a lasting impression, use professional export settings.
Common Mistakes to Avoid During Teeth Whitening
There are several common mistakes to avoid. One is over-whitening the teeth, which results in an unnatural appearance. Another mistake is ignoring the overall balance of the image. Make sure the teeth match the lighting and tones of the rest of the photograph. Also, be careful not to whiten the gums or skin around the teeth, as this can also create an artificial look. Not using the Adjustment Brush carefully can lead to visible lines or halos around the teeth. Finally, always review the image at different zoom levels and make sure you like the final result.